Hi everybody! Are you ready for a new blog tutorial here at Design It Chic?! So let's get started then! Without further ado, the topic for today is: add a floating "back to top" button. This tutorial is going to be fun and simple, so what are we waiting for?!.. Let's start the party!

1. First step, you have to upload your own picture to an image hosting website, such as Flickr, ImageShack, TinyPic, or any other.
2. Now you're ready to get to the next step, so you need to sign in your blogger "Dashboard", go to "Design" and then press the "Edit HTML" tab.

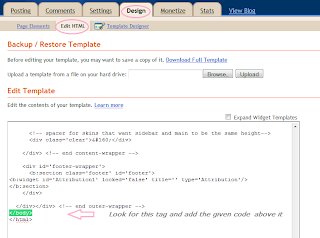
3. Next, scroll down the page until you find this tag, or simply use the Ctrl + F (for Windows users) or Command + F (for MAC users) combination on your keyboard to find it faster:
</body>
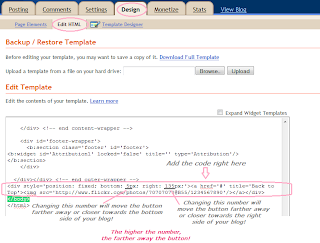
4. Once you found it, add the following piece of code right above it:
5. Now you need to replace the IMAGE URL text in the above code, with the actual URL of your image uploaded on an image hosting website. The end result should look something similar to this:

6. You can change the placement of the button by changing the numbers in the code. The higher the numbers, the farther away from the respective sides of your blog, the button will be.
7. After adding your image URL and customizing the distance between the button and the bottom/right sides of your blog, preview your work, and if everything works out as you want, you can now go ahead and click "save template".

That's it! Hope you guys enjoyed this little tutorial!:)
And don't forget, if you missed anything here at Design It Chic, you can check the Blog Tips button at the top of the page for more tutorials, tips to improve your blog's traffic and other amazing how to's, all presented on different levels, from beginners to the more advanced ones!
Have a great day everybody!


26 comments:
Thank you very much! Just finished mine - WONDERFUL!! ~KM
Thank you for stopping by! I have this on my blog, I use it a lot when my computer is going slow...... Nice Tutorial! I am an Ex IT Gal who loves anything tutorial! I am planning on starting a Tech Tab but haven't found the time LOL. Will stay and check out the site! Have an awesome day!
Aprils Lifestyle Show
Thanks for this tip! :) Worked for me. Awesome! Thanks for the comment over on my blog, too.
Ginger
gingersnapcrafts.blogspot.com
Random question - - is there a way to have a button at the top that will take you halfway down that page? I have a tutorials page, and at the top I'd like to have a way people could click to different sections on that page - -
Joining you from the Wednesday Blog Hop! http://teched4kids.com
Hello! Thanks so much for the comment and the follow. I'm following you back now! I love this tutorial--definitely bookmarking it!
Kelly
Thank you for stopping by my blog, I'm following back. I'm going to have to try this, thanks for sharing! This is an amazing blog, and I'm looking forward to seeing what other tutorials you have to offer. =)
New follower here.
Thank you for the great tutorial! I will definitely be checking back here often :)
Teri
This is a great tutorial! Love your site. Stopping by from the blog hop.
http://craftinginlaymonsterms.blogspot.com
Thanks for the tutorial! I added it to my blog today :)
Thanks a ton for linking me to this tutorial, I am definitely going to have to work this into my template :) Cheers and have a great week!
thanks for following me because now im following you. i love your blog! thanks for all the info!
Hey girl!! Thanks for the follow and the sweet comment! I love your blog:-) I'm following you too!!
Hi, I'm a new follower - I just came from Review 4you wednesday blog hop.
Your site is great. It's terrific that you are sharing the tips and tutorials. I know I for one really appreciate this.
Please stop by when you have a chance. I look forward to reading more of your blog.
Michele
http://kidswonderart.blogspot.com
Please come and share it at my link party: http://fabricbowsandmore.blogspot.com/
How funny - I was looking for something like this! I love working on my HTML, and your tutorial is so straight forward! Thank you!!
Wow! I didn't know how to do that!!
A new follower, thank you for visiting my site!
Basilmomma
Great Tutorial, but how can you get it to work on WP themes?
Followed your link from the Thirsty Thursday Blog Hop at My Life--Smookie Style.
This is so helpful, thanks for following! Cute blog (: I'm now following back!
What a cool blog love the tutorials.
I am a newbie and just got a new blog design. I wanted to set up a shop but I don't have a clue how to go about it. I have an etsy shop but they have all the tools already there pretty simple. But with the blog I am lost. Sorry for going on and on.
I am following you from the fab friends blog hop. Please follow me.
http://itsabouttimemamaw.blogspot.com/
thanks for stopping by Baca Ohana AND for this wonderful tutorial!!!!
Great tips! I just added you to my favorites so I can follow you for some more blogging tips! Thanks for the follow. Returing the blogging love!
good info Thanks for hosting this linky party I added on pretty late I hope I get a few comments.
Love your blog Im following you now
KAT Griffin
thanks for the tutorial!
your new follower
http://momdaughterstyle.blogspot.com/
Great tutorial. I just finished making my own Back to Top button, and it worked great. Thanks!
--Jill
JillMadeIt.blogspot.com
hey great blog and very useful tips, this is pretty simple thanks a lot i will now free up some bytes. i used to have a back to top super code :S
Post a Comment