


Hi all! Are you ready for a new blog tutorial here at Design It Chic!?! Then let's get started! Without further ado, the topic for today is: numbering post comments. This is one of the most wanted tutorials that we've received requests for. Due to the versatility of it, we decided to finally present you the most updated version of this little trick.

There are many versions to accomplish this, depending on what blog template you use, but basically this tutorial is applicable to the majority of templates. In just a few easy steps, this little tutorial will help the ones who need an accountability of their comments for either their giveaways, contests with prizes, or for simply marketing purposes. Now let's begin this tutorial!
1. As always, before doing any changes, make sure you save your current blog's template by signing in your "Dashboard" and then go to "Design" and select the "Edit HTML" tab and press "Download Full Template".

2. After you saved your blog's current template, make sure you have your comments embedded below posts, and not the pop-up version. If you are not sure of that, you can change this by going to "Settings", click on the "Comments" tab, and third row down the line you will find this option. Make sure you check the "Embedded below post" bullet!

3. Now that we have everything prepared for the trick, let's begin the numbering comments process. You first need to go to "Design" tab then hit the "Edit Html" button. Make sure you check the "Expand Widget Templates" option and look for this piece of code as shown in the picture below, by either scrolling down or simply using the Ctrl + F (for Windows users) or Command + F (for MAC users) combination on your keyboard:
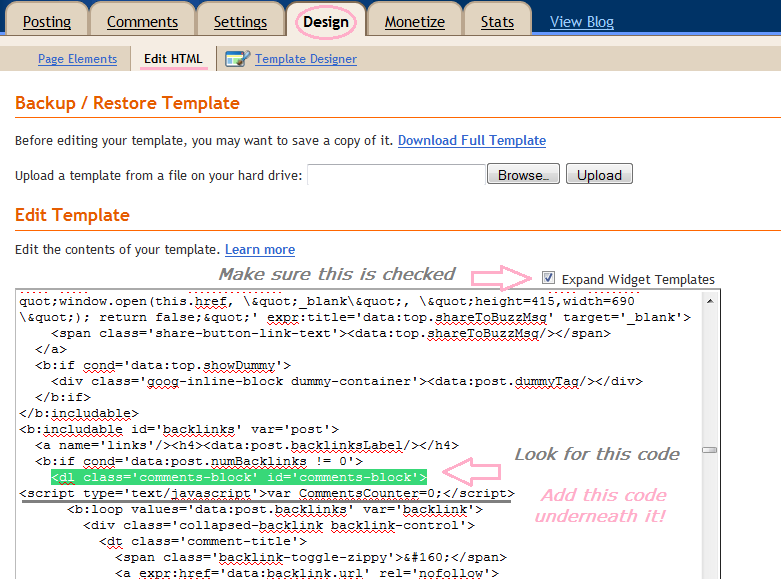
4. Now that you found the code, paste this code immediately under it, as shown in the picture above:
5. Next step is to look for this piece of code:

6. And add this code immediately under it as shown in the picture above:
7. On the next step you need to look for this piece of code:

8. And add this attribute to the code immediately before the closing tag of the line, as shown in the picture above:
9. Just a couple more steps and we're there, so now look for this code:

10. And immediately under it add this structure of codes, as shown in the picture above:
Preview your work, and if there's no parsing mistakes and everything works(even tough you probably won't be able to see the numbering in the preview), you can go ahead and click "save template". And your final result should be something similar to this:

That's it! Hope you guys enjoyed this little tutorial!:)
And don't forget, if you missed anything here at Design It Chic, you can check the Blog Tips button at the top of the page for more tutorials, tips to improve your blog's traffic or other amazing how to's, all presented on different levels, from beginners to the more advanced ones!
Have a great week everybody!


47 comments:
Thanks for this!
following you! www.myhealthysushi.com
Thanks for sharing these great tips! Newest follower from Get Wired Wednesday hop! Thanks for visiting Three Boys and an Old Lady
http://threeboysandanoldlady.blogspot.com
Wow! What a fabulous tutorial. Thanks! Do you think this would work for Intense Debate?
Yay!! Thank you so much for this tutorial! It was really easy to follow - and I was even able to find some bad code in there and replace it with what should have been there in the first place!
Thanks for the follow,following you back and thanks for the tutorial!
Thanks for posting this tutorial!! I've been wanting to know how to do that for a while!
Thanks so much for dropping by the Be-Bop-A Blog Hop! I'm a follower and I hope you'll stop by again soon! Have a great day! :)
thank you so much for the tutorial.. I have been looking for this for a while.. Love your blog.. returned to say Hi :)
following you now..
love
hani
http://craftionary.blogspot.com
Thanks for this....I have been seeing this a lot lately. Good for giveaways, you know your luck number, hopefully ;)
Thanks I am a new follower from the blog hop and this post is spectacular, very useful!! Thanks for checking out my blog.
Toni @ runninglovingliving
thanks for stopping by crichmanfreebies, returning the love
thanks-following you back from the blog hop.
free & frugal mommy of one
Love your blog- definitely bookmarking you! Stopping by from Saving With Wendy
Thanks for following my blog. I love blog tutorials! I'll be back for sure!
Thanks for a great tutorial. Super easy to follow. And thanks for visiting my blog. I'm already a follower of your great blog! Thanks again for all the great tutorials! http://cherishedhandmadetreasures.blogpsot.com
I am in serious need of trying to figure out how to put a horizontal link bar across the top of my blog and believe me I have tried enough times I had to quit before I lost a lot of precious work...I appreciate any help or direction!!
So great!! I actually wrote a post about it:
http://www.idotheewedsara.com/2011/04/technologically-impaired.html
Thx for the tips. Following back now. Thanks for stopping by and following. :)
Great post!! Thanks for stopping by and I'm returning the love. Newest GFC follower
Thank you! I've been looking into doing something like this for a while.
This is such a great tutorial. Already bookmarked :)
Have a great day!
-Ellie
thanks for tips on blog for numbering comments in blogger's blog.
Wow, I am impressed with this excellent tutorial!
Have to admit that you had ME with the Twilight Series books; one more kindred Vampire spirit!
Thanks for visiting my blog and leaving such a nice comment!
Patty
Hi, thanks for your comment on Bentobloggy.com! I'm following you.
-Emily
Bentobloggy.com
this is a GREAT tutorial! i am bookmarking it :))
xo, shari
be sure to add your blog to the new blog hop this week on Spearmint Baby:
http://www.spearmintbaby.com/2011/03/blogging-101_06.html
Thanks for stopping by my blog. I will be now following and def see what you have to offer to put on my blog.
Xoxolisa
My goodness you are some kind of genius!
You are officially my hero...I had searched for a tutorial on numbering blog comments but hadn't found anything that made enough sense! My comments are now numbered, and I will now stay slightly more sane during giveaways...thank you :)
Thanks for the helpful tutorial! Following you. xoxo
http://fcukyouverymuch.blogspot.com
Thanks for the tutorial. However, are we not having a Boost My Blog Friday party today?
THANK YOU!!! This was so easy to follow. All of the other tutorials out there are so very complicated.
Best,
Emily from Nap Time Is My Time
absolutely brilliant! thank you SO much!!
Thanks so much for this great tute, its the 3rd one I tried to number my comments and it worked great :-)
Thanks for the tutorial! Now following you! :)
http://dessayz.blogspot.com/
thank you so much for this tutorial.. it was a life saver.. and amazingly easy to follow..
Hani
www.craftionary.blogspot.com
Hi - really, really hoping you can help! I've implemented the numbers per your fabulous tutorial, but they are doubling up. There is a 1. next to the commenter's name and then 2. after their comment. Is it possible to take a look and see what I may be missing?
www.gigisgoneshopping.com
I've been trying to do this for months, working w/various tutorials. This is the closest I've gotten so far!
gigiofca@gmail.com
I GOT IT!!!!!!!!!!!!!! Thanks for sharing such a great tutorial.
Wow, wow, WOW! You just made my entire morning. Completed this in about three minutes flat. I thought I was going to have to count through all 311 giveaway comments... Glad I Googled this topic. Your blog is now on my favorites list! :)
sweetideasphotoexpressions.blogspot.com
Uh-oh. I did just find one teensy-weensy problem. When the number hits 200 - it starts over again at 1. ;) Not IMPOSSIBLE to figure out, but it would definitely be easier if it just kept counting up - 201, 202... Would love to know if you've got a fix for that!
Thank you for this, I really needed this on my giveaway blog! However I have the same issue as Sweet Ideas Photo Expressions where it will only go up to 200 and then starts over at 1. Any suggestions? Thank you!
Thank you SO very much. Seriously, I was about to write a post offering to PAY someone to do this for me! Now I don't have to! I wondered the same about the 200 comments, but I think I'll do some more research!
Well, dang. I hadn't noticed, but it worked great when I had the style='clear: both;' part in the wrong spot. When I put it in the wrong spot, it said style='clear: both;' before the person's name (that you can click on). When I put that in the right spot, the numbers disappeared. On my giveaway blog, the numbers appear sporadically. It's SO weird and frustrating!!! It would save me so much time if I could get these numbered for my giveaways. Any tips??? I'm sorry, I'm sure you get sick of these questions!
http://alemonsqueezyhomereviews.blogspot.com/
Don't know what's up with my code, but I can't find the code in step 7 anywhere on my template! Help!
Thanks for all your awesome tips!! Very helpful!
Thanks for this great tutorial! Only one I could get to work for me...though I did have to remove part of the code to get it to work on my template. Still, wouldn't have been able to do it w/out this tutorial!
I followed your directions but and getting the string
style='clear: both;'
before each name.
Can you help me please?
http://craizeecorner.blogspot.com/2011/08/tula-pink-month-and-giveaway.html
thank you so much for this tutorial! :D
Francesca
Post a Comment