Showing posts with label DIY. Show all posts

Surprise!!! Surprise!!!

Oh the weekend finally came:) i thought I'd never see this day! anyway here's some cute beads i got this weekend


So i guess I'll give it a try making me some cute necklaces with these.. I'm out now!

Small Upgrade & co

Today I'm in a pretty shiny mood! It's my husband's and I 5th anniversary since we are together. We always celebrate every month all the anniversaries(the day we got together, the day we got engaged, the day we got married) anyway these are small details important to us.. but today we celebrate 5 years of being together..and that's a happy moment in all dimensions, right?!? :)

Oh on another sadder note.. i lost a follower today! I hate when that happens especially since i couldn't even trace him down and beg to stay:P oh well, to the rest of you guys who stayed loyal, i salute you!!!

Now on to some small upgrade i made last night. I had a frame that i bought somewhere in March and never used it by now. I was thinking what to do with it since it's kinda big.. and then it hit me.. there's a perfect spot on this wall that needs to be cheered up! I started with a vintage frame:

And now the final result:


What do you guys think? I think it's simple and it gives personality to that wall.
Like it?? Or not so much??

Jewelry Making???

Here's the new week starting off.. and there's so many things on the plan here.. my lil' bro' came over to visit and he is staying with us for the summer.. so things are gonna be probably a wee bit slower on the blog.. yet I'll try to keep up.
So today i wanna run something by you ladies... I started making some rings the past week and i am curious what do you lovely ladies think of them... here's some sample


so.. your verdict??? thumbs up or down???

Pop The Balls...

If lately you're having an urge for all things natural-looking, then you're stopping at the right spot. I'm in that place too, and being a cheapo-hunter at heart, i stumbled over this step by step tutorial that our friends at Crafty Nest. presented us a while back.


Image Courtesy of Crafty Nest

Yup, that's right .. I'm talking about hemp pendant lamps.. don't they look cute and all??? And the texture they have, and all those earth tones they bring in your place... oh so dreamy...
And as the crafty nesters are pros' already, they did the dirty job of finding the best ways to achieve this beautiful result, so we can skip the no-no's parts and get it right from the beginning.

Here's the supplies and tools you need:

# large bouncy balls of various sizes
# clear drying craft glue (such as Aleene’s Clear Gel Tacky Glue) 1 bottle per ball approx.
# hemp string 20lb. weight
estimated amounts needed:
16 inch diameter ball—400 yards
14 inch diameter ball—300 yards
9 inch diameter ball—100 yards
# plastic gloves (optional)
# trash bag or small drop cloth
# permanent marker
# ball deflator or something sharp to pop the ball
# light fixture and hardware

Bottom line the steps cut to this:

1. run the hemp string through the glue


2. then glue and wrap(over and over)


3. let the glue dry completely(2 days or so)
4. pop the ball


5. add the light fixture of your choice through the new shades


Pictures Courtesy of Crafty Nest

If some of you guys look for more specifics on how to make these hemp pendant lamps, go over to Crafty Nest and see the great job they're doing there!

I for one, I'm thinking of making this project asap. What do you guys think??
Oh it looks so easy-peasy when you just look at the images.. but i bet I'm gonna need tons of ice tea and a lot of brain cells to sacrifice for this project:)

Happy Monday Everyone!!!

Wrap it up

OK guys i won't keep it long today. I just wanted to share with you some crafts.. actually is not even crafts.. is just a DIY project i got started half an hour ago and i thought is cute enough to share:)

I always love me some white crunchy chocolate.. no, i am not keeping diets.. my physique is having its own self control.. i am just one of those happy people:P .. but as i was saying... crunchy chocolate always tickles my tastes.. and as we were having one around the house, i just went for it. But before eating it, it just hit me! The wrap was lame and depressing.. too commercial for my tastes.. look:

And so i thought i wanted something more cheerful.. so up to the decorating the chocolate i was.. (sounds weird right? decorating the chocolate?.. when in fact generally chocolate itself is used to make decorations, for Christmas and stuff.. but however this was my crazy thought at the moment and i went for it)

I opened the chocolate's wrapping box and i discovered this beautiful silver wrapping paper..


smth much better to work with, right? right...

Then i went through my wraps and found this striped pink patterned wrapping paper. I cut some of it and then wrap the chocolate over the silver wrapping thing. Look how it turned:


Pretty hot, right?
But i still felt like something was missing.. so it just popped into my head: a name tag sort of thingy!!! I just took a black pen and some white paper and i started doing swirls all over the edge.. and then... Tadaaaaaaaaaaaaaaaaaaaam!!!!:


Pretty cute right? Now i can give it away as a small host gift or so.. or even let it on my coffee table just for decor purposes.. or just eat it like a piggy:)

You get to choose! Tell me guys.. is this chocolate wrapping thing good enough to be eaten, to be used as decor or to be given away! Shoot me with choices:)

Tiny Little Changes

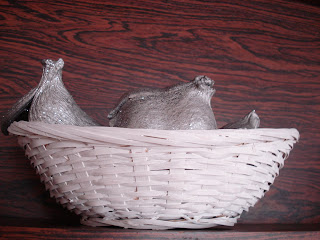
Well today i was cleaning the bedroom as every morning and after piking up all the small items (tea cups, small spoons, napkins, vitamins, my jewelries and stuff like that)that we left around the bed at night(yeah when we're tired we tend to throw things around the bed without caring for the mess...even tough i am a cleaning freak.. at night those freak-ish instincts go away.. but they come back in the morning more powerful than the day before:P ), anyway..i saw this little basket on our side table. And i remembered it was a gift from my mom.
I didn't quite liked the color of it so i just put it somewhere where i forgot about it. Today tough, i decided to do something about it, so i put my gloves on, took my paints and paint brushes and i started the work.

I'm sorry i forgot to take a before picture of the actual basket but i looked over the internet to find something that looked pretty close to what my basket used to look like.. and i found this picture:


It's the small one in the right lower corner ..or sort of.. :)


After 30 min and 2 coats of white wood paint, the result was this:


I find it quite nice and chic comparing to the initial look. And I'm working on the place where to put it! I'll share with you once everything is done there.. til' then i hope you enjoyed my basket makeover!

Buah buahye!!!

What do you do with a drunken sailor?

Well it's not actually a sailor.. and it's not quite drunken either. Actually it's all about color...
So what do you do when you're bored around the house? Of course you're right: you start looking for DIY projects. And what kind of DIY projects can you do when your pay check is far away from coming home to mama ? Of course you're digging your basement for some paint you bought a while ago and forgot to use it.

Well lucky me i found in our basement some remaining paint from the living room. And as i said before, being home alone(husband at work), i started painting the hallway myself.. what do you think, i wanted something with stripes.. lots of stripes...

Of course the stripes are not straight. What were you thinking?..Where you thinking that i wanted them straight?? Nooooo.. anybody could have done them straight.. i wanted them to be uneven.. and messy.. and NOT STRAIGHT:P (I'm just trying to get myself out of this one ..the truth is that i was tired from sticking and unsticking the painting band and it was already 11pm which says it all..)

Anyway, just saying.. i hope you guys have a great week!

DIY Hardware

You might think that this is a post where i share with you some of my experience with hardware around the house.. well it's not.. it's actually something more like a virtually DIY project.. let me explain: i was webbing around and then on the Bower Power blog i saw her post linking to Anthropologie store.. first thing i did before reading BP's post was to check out what the Anthropologie has to say about this:).. and there it was.. this DIY virtual project. You can choose from different furniture(you can also select the color of each piece of furniture) to which later you can add your own choice of hardware(also you ca choose colors to some of them) from the Anthropologie store.

So here's some of the DIY Virtually Projects i did..

This is Chic:


And this is more retro-like:


Now, go check the Anthropologie web and then show back with your own choice of super duper hardware!

Happy Hardware everyone!

Fabulous Ottoman Idea

I would always like me some fabulous, decorative, yet comfortable ottoman for my living room, but as i never found one that was fitting perfectly into the look i wanted to create, i actually figured out that i might have more success if i kinda create my own one.
You wonder how?.. well i thought of buying one that fits the form and size and comfort that i was looking for and then buy some yards of fabric that i loved.. and redo the ottoman my own style.

These being said... this is the first trial to find me my mate ottoman :)

Here's the Ottoman from Overstock that i kinda liked and it was also budget friendly


And here's the Fabric i would like to cover the nice ottoman with


So you guys can figure out how this should look like put together right?.. What do you guys say?.. Is that ottoman one of a fit choice for me or is it just too 'tacky'?
Also if u pass by,shoot me down with some other ideas as well!
Hope you enjoy the first option here tough..
One down, more to come :) Stay tuned!

Secretary Love

I don't know if you guys know this about me, but i am passionate about all the fabulous makeovers and DIY projects. I love seeing things becoming something else or even renew the look of a furniture/art/room by adding a little more zing and pep.
So in my hunt for chic transformations, i stumbled over this beautiful baby over EddieRoss

This is the Before shot:


And this is the After shot:


Isn't this lovely work, or what?

Thumb up for Eddie and his fabulous makeover!


Pictures courtesy of EddieRoss