Boost My Blog Friday - 4/01


Hi everybody! Today is Friday, that means it's time again to catch up with Boost My Blog Friday here on Design It Chic!


For those of you new here, it's very simple.. the only rule is: no rules!! That's right!! This blog-hop is supposed to be a boost in our blogs' asses... friends-wise:)!!
So just make sure you link with us, follow us as the host (and leave us a comment so we know you follow us and return the love back:) and then feel free to follow whoever you want to, leave nice comments, send them love notes and chocolate boxes *WOW scratch that last part:P* and don't forget to do the happy dance!

If you join with us on Boost My Blog Friday, please take your time and leave a comment, so we know you're participating with us and maybe pay you a visit:) Thanks!


And as always, today we have another question for you:
Waterproof or regular mascara?

Waterproof mascara makes more sense, since it can be worn on any occasion without risking to have dark lines on your face if it happens to rain or cry a bit of jealousy excitement cause your tight ass super fun colleague just got promoted:P So we're sticking to waterproof for now. Anyone join the club?! Just share your mascara tricks here with us and also find out what other fellow bloggers opted for too:) Now let's get this party started!


And, if you missed anything here at Design It Chic, you can check the Blogger tutorial section for more blog tutorials, the SEO department for more tips to improve your blog's traffic or check out the Unclutter tips column for more tips on making your blog clean and easy to access! Happy Friday all!


Replace Next/Previous/Home Buttons


Hi all! Are you ready for a new blog tutorial here at Design It Chic!?! Then let's get started! Without further ado, the topic for today is: how to replace the next/previous/home buttons with your desired ones. This will make your blog unique and special and it's not even that hard to do. So let's proceed with the tutorial:)

#ff63e0


1. First thing, you need to save your current blog's template by signing in your "Dashboard" and then go to "Design" and select the "Edit HTML" tab and press "Download Full Template".


2. After you saved your blog's current template, make sure you check the "Expand Widget Templates" option and look for this piece of code as shown in the picture below, by either scrolling down or simply using the Ctrl + F (for Windows users) or Command + F (for MAC users) combination on your keyboard:


3. Now that you found the code paste this piece of code instead of it:


4. Next step is to replace the "YOUR IMAGE LINK" with the actual link of your first image. Previous to this step, you should upload your desired pictures you want to use for this project(size max. 120px wide and 70px high) on an image hosting website, such as Flickr, ImageShack, TinyPic, etc., from where you can get the link of your image that you need.

5. Once you're done with uploading the pictures to the image hosting site and adding the respective image link inside of the code from step 3, you need to look for this piece of code:


6. Now that you found the code paste this piece of code instead of it:


7. Next step after you replace the "YOUR IMAGE LINK" with the actual link of your second image, look for this piece of code:


8. Now that you found the code paste this piece of code instead of it and don't forget to replace the "YOUR IMAGE LINK" with the actual link of your third image:


9. Last step before saving is previewing your work, and if it looks good then hit "Save Template", and your blog should look something similar from this:


To this:

And just a side note, if you want to place the buttons from "next" and "previous" the other way around, as in change the left side and right side in between them, just switch the replacing code from step 3 with the one from step 6 and you'll get the buttons placed the opposite side.


That's it! Hope you guys enjoyed this little tutorial!:)

And don't forget, if you missed anything here at Design It Chic, you can check the Blog Tips button at the top of the page for more tutorials, tips to improve your blog's traffic and other amazing how to's, all presented on different levels, from beginners to the more advanced ones!
Have a great week everybody!


Boost My Blog Friday - 3/25


Hi everybody! Today is Friday, that means it's time again to catch up with Boost My Blog Friday here on Design It Chic!


For those of you new here, it's very simple.. the only rule is: no rules!! That's right!! This blog-hop is supposed to be a boost in our blogs' asses... friends-wise:)!!
So just make sure you link with us, follow us as the host (and leave us a comment so we know you follow us and return the love back:) and then feel free to follow whoever you want to, leave nice comments, send them love notes and chocolate boxes *WOW scratch that last part:P* and don't forget to do the happy dance!

If you join with us on Boost My Blog Friday, please take your time and leave a comment, so we know you're participating with us and maybe pay you a visit:) Thanks!


And as always, today we have another question for you:
Curly hair or straight hair?

We're very big fans of curly hair over here. You know how they say.. you always want what you don't have:P But having straight hair maybe isn't the worst thing in the world since you can curl it right away with a curling iron but it still has that fine texture the straight hair has. Well when you don't have what you want you find ways to enjoy what you have, right?!:) Now feel free to share your hair situation here with us and also find out what other fellow bloggers have to say too:) Now let's get this party started!


And, if you missed anything here at Design It Chic, you can check the Blogger tutorial section for more blog tutorials, the SEO department for more tips to improve your blog's traffic or check out the Unclutter tips column for more tips on making your blog clean and easy to access! Happy Friday all!


Add Icon Before The Post Title


Hi all! Are you ready for a new blog tutorial here at Design It Chic!?! Then let's get started! Without further ado, the topic for today is: how to add an icon before the post title. This will make your blog unique and special and it's not even that hard to do. So let's cut it short and proceed with the tutorial:)

#ff63e0


1. First thing, you need to save your current blog's template by signing in your "Dashboard" and then go to "Design" and select the "Edit HTML" tab.


2. After you saved your blog's current template, make sure you check the "Expand Widget Templates" option and look for this piece of code as shown in the picture below, by either scrolling down or simply using the Ctrl + F (for Windows users) or Command + F (for MAC users) combination on your keyboard:


3. Now that you found the code paste this piece of code immediately underneath it:


4. Next step is to replace the "LINK OF YOUR IMAGE" with the actual link of your image. Previous to this step, you should upload your desired picture(size approx. 50px wide and 30px high) on an image hosting website, such as Flickr, ImageShack, TinyPic, etc., from where you can get the link of your image that you need.


5. Once you're done with uploading the picture to the image hosting site and adding the image link inside of the code from step 3, you need to look for this piece of code:


6. Now delete the next two lines underneath this code as shown in the picture below:


7. Last step before saving is previewing your work, and if it looks good then hit "Save Template", and your posts should look something similar to this:


That's it! Hope you guys enjoyed this little tutorial.

And don't forget, if you missed anything here at Design It Chic, you can check the Blog Tips button at the top of the page for more tutorials, tips to improve your blog's traffic and other amazing how to's, all presented on different levels, from beginners to the more advanced ones!
Have a great week everybody!


Boost My Blog Friday - 3/18


Hi everybody! Today is Friday, that means it's time again to catch up with Boost My Blog Friday here on Design It Chic!


For those of you new here, it's very simple.. the only rule is: no rules!! That's right!! This blog-hop is supposed to be a boost in our blogs' asses... friends-wise:)!!
So just make sure you link with us, follow us as the host (and leave us a comment so we know you follow us and return the love back:) and then feel free to follow whoever you want to, leave nice comments, send them love notes and chocolate boxes *WOW scratch that last part:P* and don't forget to do the happy dance!

If you join with us on Boost My Blog Friday, please take your time and leave a comment, so we know you're participating with us and maybe pay you a visit:) Thanks!


And as always, today we have another question for you:
How does your toilet paper hangs: over or under the roll?

Well most of the days the magic paper hangs over. It's a really golden rule when you're the one who changes it. And another rule that always accompanies the other is: if you used the lasts tissues on the roll, you got to change it.. PRONTO!! Now feel free to share your over or under paper tricks here with us and also find out what other fellow bloggers choose too:) Now let's get this party started!


And, if you missed anything here at Design It Chic, you can check the Blogger tutorial section for more blog tutorials, the SEO department for more tips to improve your blog's traffic or check out the Unclutter tips column for more tips on making your blog clean and easy to access! Happy Friday all!


Different Backgrounds For Each Post


Hi all! Are you ready for a new blog tutorial here at Design It Chic!?! Then let's get started! Without further ado, the topic for today is: how to create different backgrounds for each post. This will definitely be a super hit especially if your blog focuses on more topics:)

#ff63e0


1. This little trick it's as easy as 1, 2, 3. First thing, you need to sign in your blog's "Dashboard" and then go to "Posting" and select the "New Post" tab. Make sure you're in the "Edit Html" composing mode as shown in the picture below:


2. Now before you start writing your post as you regularly do, you need to add this piece of code in your blog's text editor:


3. Once you added the code, you now need to upload the picture you want to use as the post's background to a free image web-host. A few examples are: Flickr, ImageShack, TinyPic, etc.


4. Once you have uploaded your picture, you need to copy the direct link of your picture and paste it instead of "YOUR_PICTURE'S_LINK" part of the code given in the second step of this tutorial. If you don't know how a "picture's link" looks like, here's an example:


5. Now you can start typing your post, but your text should be written before the ending "div" tag as shown in the picture below:


6. After you're done writing your post, everything should look something similar to this:


7. Now you can hit "Publish Post", and your post should look like this:


That's it! Hope you guys enjoyed this little tutorial. Now you can have a different background to each post you want, by simply uploading new photos in your Flickr account and change the picture's link in the code above. This way not only will you impress your readers with how cool you are but you can also keep your posts organized by the background theme:) Pretty neat, right?!

And don't forget, if you missed anything here at Design It Chic, you can check the Blogger tutorial section for more tutorials, the SEO department for more tips to improve your blog's traffic or check out the Unclutter tips column for more tips on making your blog clean and easy to access!
Have a great week everybody!


Boost My Blog Friday - 3/11


Hi everybody! Today is Friday, that means it's time again to catch up with Boost My Blog Friday here on Design It Chic!


For those of you new here, it's very simple.. the only rule is: no rules!! That's right!! This blog-hop is supposed to be a boost in our blogs' asses... friends-wise:)!!
So just make sure you link with us, follow us as the host (and leave us a comment so we know you follow us and return the love back:) and then feel free to follow whoever you want to, leave nice comments, send them love notes and chocolate boxes *WOW scratch that last part:P* and don't forget to do the happy dance!

If you join with us on Boost My Blog Friday, please take your time and leave a comment, so we know you're participating with us and maybe pay you a visit:) Thanks!


And as always, today we have another question for you:
Odd or even?

It's a pretty odd situation in here:) From dates to number of songs in the iPod list, to clothing items in the closet, to books on a shelf, everything pretty much is odd around this place. For some reasons odd is associated with balance in here.. even tough that doesn't quite make sense, right?!:) Well, we're odd like that;) hi hi Anyways, now feel free to share your odd or even choice here with us and also find out what other fellow bloggers have to say too:) Let the odd fun begin!


And, if you missed anything here at Design It Chic, you can check the Blogger tutorial section for more blog tutorials, the SEO department for more tips to improve your blog's traffic or check out the Unclutter tips column for more tips on making your blog clean and easy to access! Happy Friday all!


How to create "Roll Over" pictures


Hi all! Are you ready for a new blog tutorial here at Design It Chic!?! Then let's get started! This tutorial will be focusing on some special features for our blog posts, so the topic for today is: how to create the roll over pictures. This will definitely help if you want to showcase "before" and "after" pictures or close-ups of your favorite crafts:) And more important, you can do this trick in many ways, but today we'll present you just two of them that use the same code but apply it differently.

#ff63e0


1. The easier way to achieve this is to 
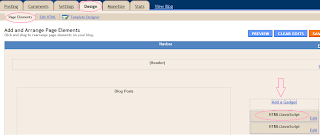
easily sign your blog's "Dashboard" and then go to "Design" and hit the "Page Elements" tab. Now go ahead and add an HTML/Java Script gadget on either sidebar, and then skip to step 3 of this tutorial.


2. The more complicated way to achieve this, is by signing in your blog's "Dashboard" and then go to "Design" and make sure you're on the "Edit HTML" tab. Once you're there, scroll down and find the "body" end tag exactly as shown in the picture below:

</body>


3. Now if you chose the first way to do this trick, simply place this code in the HTML/Java Script gadget you added, or if you chose the other way, then place the same code immediately above the "body" end tag, and don't forget to press the "Save"/"Save Template" button, at the end:

<script type='text/javascript'>
//<![CDATA[

function pat_getByClass(c){
ems=new Array();e=document.getElementsByTagName('*');pattern=new RegExp('(^|\\\\s)'+c+'(\\\\s|$)');
for(i=0,j=0;i<e.length;i++)if(pattern.test(e[i].className)){ems[j]=e[i];j++;}
return ems;
};

function ps_flipit(){
var c = pat_getByClass('flipit');
for(i=0;i<c.length;i++){
c[i].firstChild.onmouseover=function(){
this.style.display='none';
this.parentNode.lastChild.style.display='';
};
c[i].lastChild.onmouseout=function(){
this.style.display='none';
this.parentNode.firstChild.style.display='';
};
}
}

ps_flipit();

//]]>
</script>


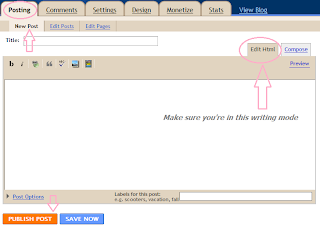
4. From this step forward, the next steps are the same regardless the way you chose to do this trick. So, now you need to go back to "Posting" and then click the "New Post" button and make sure you're in the "Edit Html" writing mode instead of "Compose".


5. Now upload your first picture normally. Instead of the picture itself you will see a weird long string of script because you're in the "Edit Html" writing mode. That's ok. Now upload your second picture the same way, but be aware that its string of script will appear up first on your writing editor, so you need to cut it and paste it after the first string of script you uploaded. Now you have the correct order. Don't switch between "Edit Html" mode and "Compose" mode during writing your post or else your coding won't apply and you'll need to start the uploading pictures process again.


6. Now comes the last step before you publish your post. 
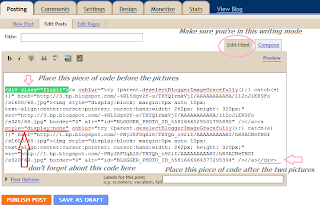
You need to post this piece of code BEFORE the codes of the pictures:

<div class="flipit">

7. Then place this piece of code AFTER the codes of the pictures:

</div>

8. And lastly, add this feature to the SECOND picture's code right after the "<a" tag like in the image shown above:

style="display:none"


9. Now you hit "Publish Post" and go back and you will see your first picture up front and when you roll your mouse over it, the second one will show up. You can use this feature for a close up of your initial picture or to showcase some beautiful "before" and "after" shots.


There's one thing you need to know: you can post only two picture at once using this method: one that will be the initial front picture and one that will show up once you roll over it. If you want to post multiple roll over pictures, you need to repeat steps 4 to 8.
But I must say that using this special effect feature will be a super hit with your readers, so hope this little tutorial will help you display your pictures in a more organized way with a better impact on your readers:)

And don't forget, if you missed anything here at Design It Chic, you can check the Blog Tips button at the top of the page for more tutorials, tips to improve your blog's traffic and other how to's, all presented on different levels, from beginners to the more advanced ones!
Have a great week everybody!


Boost My Blog Friday - 3/04


Hi everybody! Today is Friday, that means it's time again to catch up with Boost My Blog Friday here on Design It Chic!


For those of you new here, it's very simple.. the only rule is: no rules!! That's right!! This blog-hop is supposed to be a boost in our blogs' asses... friends-wise:)!!
So just make sure you link with us, follow us as the host (and leave us a comment so we know you follow us and return the love back:) and then feel free to follow whoever you want to, leave nice comments, send them love notes and chocolate boxes *WOW scratch that last part:P* and don't forget to do the happy dance!

If you join with us on Boost My Blog Friday, please take your time and leave a comment, so we know you're participating with us and maybe pay you a visit:) Thanks!


And as always, today we have another question for you:
Smooth or crunchy peanut butter?

It's all about the crunchiness over here. Smooth is just too smooth, so if we're out of the crunchy kind, we just toss some real peanuts in the smooth one and we call it a day:) That's how much we love the crunchiness... I guess this word is probably gonna be stuck in my brain for the rest of the weekend.. "CRUNCHINESS... CRUNCHINESS.." like "GOOS-FRA-BAAAAA", you know.. like in the movie:) Anyways, now feel free to share your peanut butter choice here with us and also find out what other fellow bloggers like too:) Let the fun begin!


And, if you missed anything here at Design It Chic, you can check the Blogger tutorial section for more blog tutorials, the SEO department for more tips to improve your blog's traffic or check out the Unclutter tips column for more tips on making your blog clean and easy to access! Happy Friday all!