Hi all! Are you ready for a new blog tutorial here at Design It Chic!?! Then let's get started! This tutorial will be focusing on some special features for our blog posts, so the topic for today is: how to create the roll over pictures. This will definitely help if you want to showcase "before" and "after" pictures or close-ups of your favorite crafts:) And more important, you can do this trick in many ways, but today we'll present you just two of them that use the same code but apply it differently.
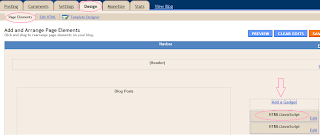
1. The easier way to achieve this is to easily sign your blog's "Dashboard" and then go to "Design" and hit the "Page Elements" tab. Now go ahead and add an HTML/Java Script gadget on either sidebar, and then skip to step 3 of this tutorial.

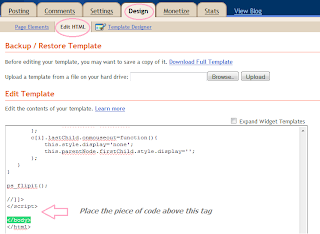
2. The more complicated way to achieve this, is by signing in your blog's "Dashboard" and then go to "Design" and make sure you're on the "Edit HTML" tab. Once you're there, scroll down and find the "body" end tag exactly as shown in the picture below:
</body>

3. Now if you chose the first way to do this trick, simply place this code in the HTML/Java Script gadget you added, or if you chose the other way, then place the same code immediately above the "body" end tag, and don't forget to press the "Save"/"Save Template" button, at the end:
<script type='text/javascript'>
//<![CDATA[
function pat_getByClass(c){
ems=new Array();e=document.getElementsByTagName('*');pattern=new RegExp('(^|\\\\s)'+c+'(\\\\s|$)');
for(i=0,j=0;i<e.length;i++)if(pattern.test(e[i].className)){ems[j]=e[i];j++;}
return ems;
};
function ps_flipit(){
var c = pat_getByClass('flipit');
for(i=0;i<c.length;i++){
c[i].firstChild.onmouseover=function(){
this.style.display='none';
this.parentNode.lastChild.style.display='';
};
c[i].lastChild.onmouseout=function(){
this.style.display='none';
this.parentNode.firstChild.style.display='';
};
}
}
ps_flipit();
//]]>
</script>
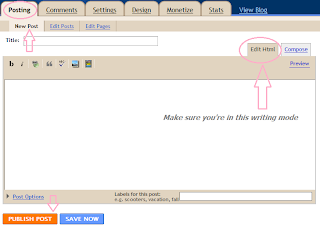
4. From this step forward, the next steps are the same regardless the way you chose to do this trick. So, now you need to go back to "Posting" and then click the "New Post" button and make sure you're in the "Edit Html" writing mode instead of "Compose".

5. Now upload your first picture normally. Instead of the picture itself you will see a weird long string of script because you're in the "Edit Html" writing mode. That's ok. Now upload your second picture the same way, but be aware that its string of script will appear up first on your writing editor, so you need to cut it and paste it after the first string of script you uploaded. Now you have the correct order. Don't switch between "Edit Html" mode and "Compose" mode during writing your post or else your coding won't apply and you'll need to start the uploading pictures process again.

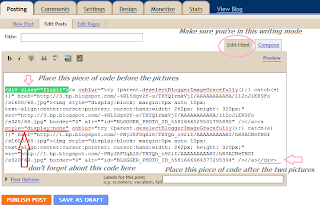
6. Now comes the last step before you publish your post. You need to post this piece of code BEFORE the codes of the pictures:
<div class="flipit">
7. Then place this piece of code AFTER the codes of the pictures:
</div>
8. And lastly, add this feature to the SECOND picture's code right after the "<a" tag like in the image shown above:
style="display:none"
9. Now you hit "Publish Post" and go back and you will see your first picture up front and when you roll your mouse over it, the second one will show up. You can use this feature for a close up of your initial picture or to showcase some beautiful "before" and "after" shots.
There's one thing you need to know: you can post only two picture at once using this method: one that will be the initial front picture and one that will show up once you roll over it. If you want to post multiple roll over pictures, you need to repeat steps 4 to 8.
But I must say that using this special effect feature will be a super hit with your readers, so hope this little tutorial will help you display your pictures in a more organized way with a better impact on your readers:)
And don't forget, if you missed anything here at Design It Chic, you can check the Blog Tips button at the top of the page for more tutorials, tips to improve your blog's traffic and other how to's, all presented on different levels, from beginners to the more advanced ones!
Have a great week everybody!


26 comments:
Thanks!!! I can't wait to try this feature!!!!! :)
Wow! Thanks so much! I'm going to try this in a post very soon. Thanks for sharing. Happy Wednesday! :o)
Thanks for the follow and this feature is very cool! I went to follow you and realized I already am!! Im going to check out some of your blog tutorials. Thanks again and I look forward to getting to know your blog!
Hmmm...it isn't working for me, but I noticed that you have some extra code BETWEEN style="display:none" and href that I don't have...
My appears this way....
<a style="display:none" href="http://
while yours has this bit of code...
<a style="display:none"
onblur="try {parent.deselectBloggerImageGracefully();} catch(e) {}"
href="http://
I'm curious if that is why it won't work for me...
Thanks for posting this tutorial :) I like learning new awesome things I can do with my blog.
Thanks for your comment and for your blog tutorial. I have look through several and bookmarked them to try on my blog. Thanks a ton!!
The Farm Girl
Thanks for the info and thanks for following me
.I am following you right back.
http://momsinvent.blogspot.com/
Thanks for all the info and thank for following me.
Your new follower http://momsinvent.blogspot.com/
Returning the follow :)
Thanks for the kind words on my blog and YES this is useful! Thanks so much :D
http://slepperymind.blogspot.com
Def bookmarking this! Following back :).
Hi! I found your blog from the Relax and Make Friendsblog hop and I love it! This tutorial is really great! I'll definitly use these tips on my blog!
Kara
pianowhimsy.blogspot.com
Help!!!! I can't get it to work!!!!! What am I doing wrong??
What a great blog! Thanks for the follow, I am following back :-)
Hi! Thanks for stopping by my blog!
I am following you back now! :)
You have such a great blog!! :)
Denay
http://workahome.blogspot.com/
Thanks...I lvoe this idea!!! Gonna have to give it a try at some point!!
Thanks for sharing this. i like to try this!
http://thendralscraft.blogspot.com
Hi! I just gave you the "Stylish Blogger Award". Please follow the link below and claim it! :)
Have a lovely day!
http://hercymonroe.blogspot.com/2011/03/my-first-blog-award.html
wow! great tip! I haven't visited in a while, been a follower but haven't checked in lately...will add you to my blog roll :) Hope all is well! I am in DESPERATE need of a blog button, and I'm sure you have a tut for that?? HOPE SO!
Cool! Now i need to do some Revamp project to just show off roll over pics!
Thanks for all of your tutorials and tips! I'll be back to check them out and look for your hop later today. :)
I'm finally following you back. I'm sorry it took so long...I just learned to check my spam folder. Duh. :)
Have a great weekend!
Mickey
www.ahelicoptermom.com
.
am following from the blog even though this is way over my head at the moment...I'll get there, right?
follow back:
childhoodmyths.blogspot.com
What a great site! I am on a blog hop tonight and am happy to be following you now!
Karen Andrews
showermebaby.blogspot.com
andrewspondcandles.com
That is so cool! You're genius!
I wondered how these were made. Thanks for the excellent tutorial! I am going to put your button on my blogging tips collection page with the title of this tutorial if you don't mind. I'm just listing the title and your blog button--they'll click over to you for the tutorial.
Mary
Thanks for stopping by Reasons to Skip the Housework! I've started a new Tuesday Time Out Link Up party - so stop back by soon!
Smiles,
Melanie
http://reasonstoskipthehousework.blogspot.com
http://reasonstoskipthehousework.blogspot.com/2011/03/tuesday-time-out-link-up-party.html
Cool!
Can't wait to try it out :-)
~Val
Post a Comment