Showing posts with label Blogger. Show all posts

Numbering Post Comments


Hi all! Are you ready for a new blog tutorial here at Design It Chic!?! Then let's get started! Without further ado, the topic for today is: numbering post comments. This is one of the most wanted tutorials that we've received requests for. Due to the versatility of it, we decided to finally present you the most updated version of this little trick.

#ff63e0


There are many versions to accomplish this, depending on what blog template you use, but basically this tutorial is applicable to the majority of templates. In just a few easy steps, this little tutorial will help the ones who need an accountability of their comments for either their giveaways, contests with prizes, or for simply marketing purposes. Now let's begin this tutorial!

1. As always, before doing any changes, make sure you save your current blog's template by signing in your "Dashboard" and then go to "Design" and select the "Edit HTML" tab and press "Download Full Template".


2. After you saved your blog's current template, make sure you have your comments embedded below posts, and not the pop-up version. If you are not sure of that, you can change this by going to "Settings", click on the "Comments" tab, and third row down the line you will find this option. Make sure you check the "Embedded below post" bullet!


3. Now that we have everything prepared for the trick, let's begin the numbering comments process. You first need to go to "Design" tab then hit the "Edit Html" button. Make sure you check the "Expand Widget Templates" option and look for this piece of code as shown in the picture below, by either scrolling down or simply using the Ctrl + F (for Windows users) or Command + F (for MAC users) combination on your keyboard:
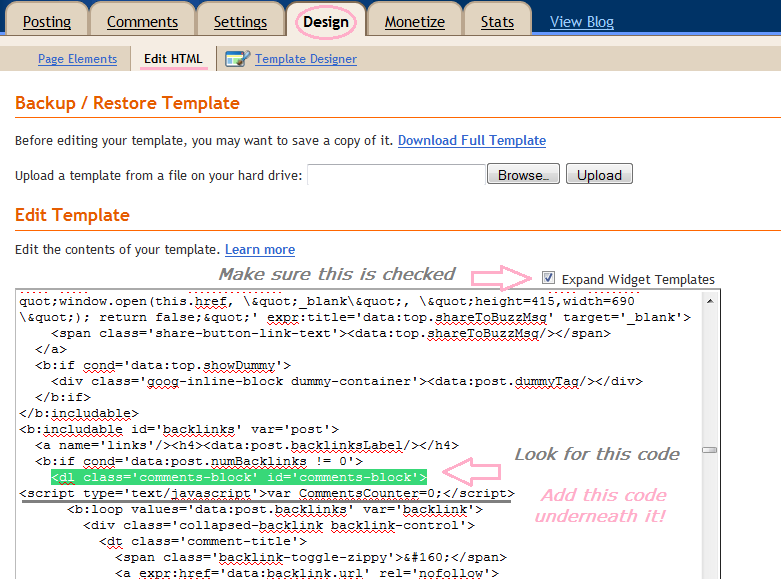


4. Now that you found the code, paste this code immediately under it, as shown in the picture above:


5. Next step is to look for this piece of code:


6. And add this code immediately under it as shown in the picture above:


7. On the next step you need to look for this piece of code:


8. And add this attribute to the code immediately before the closing tag of the line, as shown in the picture above:


9. Just a couple more steps and we're there, so now look for this code:


10. And immediately under it add this structure of codes, as shown in the picture above:


Preview your work, and if there's no parsing mistakes and everything works(even tough you probably won't be able to see the numbering in the preview), you can go ahead and click "save template". And your final result should be something similar to this:


That's it! Hope you guys enjoyed this little tutorial!:)

And don't forget, if you missed anything here at Design It Chic, you can check the Blog Tips button at the top of the page for more tutorials, tips to improve your blog's traffic or other amazing how to's, all presented on different levels, from beginners to the more advanced ones!
Have a great week everybody!


Replace Next/Previous/Home Buttons


Hi all! Are you ready for a new blog tutorial here at Design It Chic!?! Then let's get started! Without further ado, the topic for today is: how to replace the next/previous/home buttons with your desired ones. This will make your blog unique and special and it's not even that hard to do. So let's proceed with the tutorial:)

#ff63e0


1. First thing, you need to save your current blog's template by signing in your "Dashboard" and then go to "Design" and select the "Edit HTML" tab and press "Download Full Template".


2. After you saved your blog's current template, make sure you check the "Expand Widget Templates" option and look for this piece of code as shown in the picture below, by either scrolling down or simply using the Ctrl + F (for Windows users) or Command + F (for MAC users) combination on your keyboard:


3. Now that you found the code paste this piece of code instead of it:


4. Next step is to replace the "YOUR IMAGE LINK" with the actual link of your first image. Previous to this step, you should upload your desired pictures you want to use for this project(size max. 120px wide and 70px high) on an image hosting website, such as Flickr, ImageShack, TinyPic, etc., from where you can get the link of your image that you need.

5. Once you're done with uploading the pictures to the image hosting site and adding the respective image link inside of the code from step 3, you need to look for this piece of code:


6. Now that you found the code paste this piece of code instead of it:


7. Next step after you replace the "YOUR IMAGE LINK" with the actual link of your second image, look for this piece of code:


8. Now that you found the code paste this piece of code instead of it and don't forget to replace the "YOUR IMAGE LINK" with the actual link of your third image:


9. Last step before saving is previewing your work, and if it looks good then hit "Save Template", and your blog should look something similar from this:


To this:

And just a side note, if you want to place the buttons from "next" and "previous" the other way around, as in change the left side and right side in between them, just switch the replacing code from step 3 with the one from step 6 and you'll get the buttons placed the opposite side.


That's it! Hope you guys enjoyed this little tutorial!:)

And don't forget, if you missed anything here at Design It Chic, you can check the Blog Tips button at the top of the page for more tutorials, tips to improve your blog's traffic and other amazing how to's, all presented on different levels, from beginners to the more advanced ones!
Have a great week everybody!


Add Icon Before The Post Title


Hi all! Are you ready for a new blog tutorial here at Design It Chic!?! Then let's get started! Without further ado, the topic for today is: how to add an icon before the post title. This will make your blog unique and special and it's not even that hard to do. So let's cut it short and proceed with the tutorial:)

#ff63e0


1. First thing, you need to save your current blog's template by signing in your "Dashboard" and then go to "Design" and select the "Edit HTML" tab.


2. After you saved your blog's current template, make sure you check the "Expand Widget Templates" option and look for this piece of code as shown in the picture below, by either scrolling down or simply using the Ctrl + F (for Windows users) or Command + F (for MAC users) combination on your keyboard:


3. Now that you found the code paste this piece of code immediately underneath it:


4. Next step is to replace the "LINK OF YOUR IMAGE" with the actual link of your image. Previous to this step, you should upload your desired picture(size approx. 50px wide and 30px high) on an image hosting website, such as Flickr, ImageShack, TinyPic, etc., from where you can get the link of your image that you need.


5. Once you're done with uploading the picture to the image hosting site and adding the image link inside of the code from step 3, you need to look for this piece of code:


6. Now delete the next two lines underneath this code as shown in the picture below:


7. Last step before saving is previewing your work, and if it looks good then hit "Save Template", and your posts should look something similar to this:


That's it! Hope you guys enjoyed this little tutorial.

And don't forget, if you missed anything here at Design It Chic, you can check the Blog Tips button at the top of the page for more tutorials, tips to improve your blog's traffic and other amazing how to's, all presented on different levels, from beginners to the more advanced ones!
Have a great week everybody!


Different Backgrounds For Each Post


Hi all! Are you ready for a new blog tutorial here at Design It Chic!?! Then let's get started! Without further ado, the topic for today is: how to create different backgrounds for each post. This will definitely be a super hit especially if your blog focuses on more topics:)

#ff63e0


1. This little trick it's as easy as 1, 2, 3. First thing, you need to sign in your blog's "Dashboard" and then go to "Posting" and select the "New Post" tab. Make sure you're in the "Edit Html" composing mode as shown in the picture below:


2. Now before you start writing your post as you regularly do, you need to add this piece of code in your blog's text editor:


3. Once you added the code, you now need to upload the picture you want to use as the post's background to a free image web-host. A few examples are: Flickr, ImageShack, TinyPic, etc.


4. Once you have uploaded your picture, you need to copy the direct link of your picture and paste it instead of "YOUR_PICTURE'S_LINK" part of the code given in the second step of this tutorial. If you don't know how a "picture's link" looks like, here's an example:


5. Now you can start typing your post, but your text should be written before the ending "div" tag as shown in the picture below:


6. After you're done writing your post, everything should look something similar to this:


7. Now you can hit "Publish Post", and your post should look like this:


That's it! Hope you guys enjoyed this little tutorial. Now you can have a different background to each post you want, by simply uploading new photos in your Flickr account and change the picture's link in the code above. This way not only will you impress your readers with how cool you are but you can also keep your posts organized by the background theme:) Pretty neat, right?!

And don't forget, if you missed anything here at Design It Chic, you can check the Blogger tutorial section for more tutorials, the SEO department for more tips to improve your blog's traffic or check out the Unclutter tips column for more tips on making your blog clean and easy to access!
Have a great week everybody!


How to create "Roll Over" pictures


Hi all! Are you ready for a new blog tutorial here at Design It Chic!?! Then let's get started! This tutorial will be focusing on some special features for our blog posts, so the topic for today is: how to create the roll over pictures. This will definitely help if you want to showcase "before" and "after" pictures or close-ups of your favorite crafts:) And more important, you can do this trick in many ways, but today we'll present you just two of them that use the same code but apply it differently.

#ff63e0


1. The easier way to achieve this is to easily sign your blog's "Dashboard" and then go to "Design" and hit the "Page Elements" tab. Now go ahead and add an HTML/Java Script gadget on either sidebar, and then skip to step 3 of this tutorial.


2. The more complicated way to achieve this, is by signing in your blog's "Dashboard" and then go to "Design" and make sure you're on the "Edit HTML" tab. Once you're there, scroll down and find the "body" end tag exactly as shown in the picture below:

</body>


3. Now if you chose the first way to do this trick, simply place this code in the HTML/Java Script gadget you added, or if you chose the other way, then place the same code immediately above the "body" end tag, and don't forget to press the "Save"/"Save Template" button, at the end:

<script type='text/javascript'>
//<![CDATA[

function pat_getByClass(c){
ems=new Array();e=document.getElementsByTagName('*');pattern=new RegExp('(^|\\\\s)'+c+'(\\\\s|$)');
for(i=0,j=0;i<e.length;i++)if(pattern.test(e[i].className)){ems[j]=e[i];j++;}
return ems;
};

function ps_flipit(){
var c = pat_getByClass('flipit');
for(i=0;i<c.length;i++){
c[i].firstChild.onmouseover=function(){
this.style.display='none';
this.parentNode.lastChild.style.display='';
};
c[i].lastChild.onmouseout=function(){
this.style.display='none';
this.parentNode.firstChild.style.display='';
};
}
}

ps_flipit();

//]]>
</script>


4. From this step forward, the next steps are the same regardless the way you chose to do this trick. So, now you need to go back to "Posting" and then click the "New Post" button and make sure you're in the "Edit Html" writing mode instead of "Compose".


5. Now upload your first picture normally. Instead of the picture itself you will see a weird long string of script because you're in the "Edit Html" writing mode. That's ok. Now upload your second picture the same way, but be aware that its string of script will appear up first on your writing editor, so you need to cut it and paste it after the first string of script you uploaded. Now you have the correct order. Don't switch between "Edit Html" mode and "Compose" mode during writing your post or else your coding won't apply and you'll need to start the uploading pictures process again.


6. Now comes the last step before you publish your post. You need to post this piece of code BEFORE the codes of the pictures:

<div class="flipit">

7. Then place this piece of code AFTER the codes of the pictures:

</div>

8. And lastly, add this feature to the SECOND picture's code right after the "<a" tag like in the image shown above:

style="display:none"


9. Now you hit "Publish Post" and go back and you will see your first picture up front and when you roll your mouse over it, the second one will show up. You can use this feature for a close up of your initial picture or to showcase some beautiful "before" and "after" shots.


There's one thing you need to know: you can post only two picture at once using this method: one that will be the initial front picture and one that will show up once you roll over it. If you want to post multiple roll over pictures, you need to repeat steps 4 to 8.
But I must say that using this special effect feature will be a super hit with your readers, so hope this little tutorial will help you display your pictures in a more organized way with a better impact on your readers:)

And don't forget, if you missed anything here at Design It Chic, you can check the Blog Tips button at the top of the page for more tutorials, tips to improve your blog's traffic and other how to's, all presented on different levels, from beginners to the more advanced ones!
Have a great week everybody!


How To Remove The Posting Date

Hi all! Are you ready for a new blog tutorial here at Design It Chic!?! Then let's get going! Today's tutorial will be focusing on making our blogs look more professional, so the topic for today is: how to remove the posting date. This will definitely help you free up some space in the most visually targeted spot on your blog, as well as make your overall blog look more professionally:)


1. First thing, you need to sign in your blog's "Dashboard" and then go to "Design" and hit the "Page Elements" tab.


2. Now scroll down and hit the "Edit" button on the "Blog Posts" area.


3. A pop-up window will open. Next thing, you will need to unmark the first and the third bullet and then hit "Save".


4. Now make sure to click the "Save" button in the "Add and Arrange Page Elements" area, and you're done.

That's it! No more dates and other unnecessary lines that occupy space and distract attention from the posts. Hope this little tutorial will help you on the way of getting your blog look a little more professional and have fun with it:)

And don't forget, if you missed anything here at Design It Chic, you can check the Blogger tutorial section for more tutorials, the SEO department for more tips to improve your blog's traffic or check out the Unclutter tips column for more tips on making your blog clean and easy to access!
Have a great week everybody!