Hi all! Are you ready for a new blog tutorial here at Design It Chic!?! Then let's get started! Without further ado, the topic for today is: how to replace the next/previous/home buttons with your desired ones. This will make your blog unique and special and it's not even that hard to do. So let's proceed with the tutorial:)
1. First thing, you need to save your current blog's template by signing in your "Dashboard" and then go to "Design" and select the "Edit HTML" tab and press "Download Full Template".
2. After you saved your blog's current template, make sure you check the "Expand Widget Templates" option and look for this piece of code as shown in the picture below, by either scrolling down or simply using the Ctrl + F (for Windows users) or Command + F (for MAC users) combination on your keyboard:
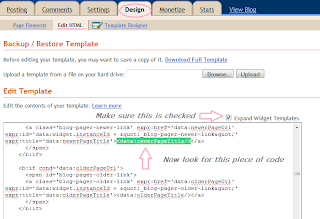
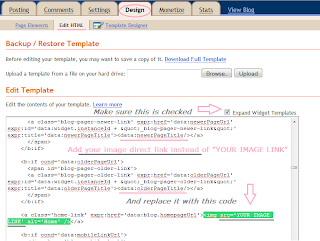
3. Now that you found the code paste this piece of code instead of it:
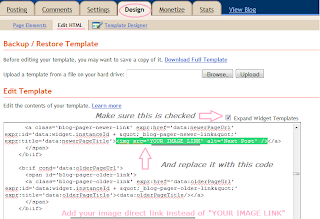
4. Next step is to replace the "YOUR IMAGE LINK" with the actual link of your first image. Previous to this step, you should upload your desired pictures you want to use for this project(size max. 120px wide and 70px high) on an image hosting website, such as Flickr, ImageShack, TinyPic, etc., from where you can get the link of your image that you need.
5. Once you're done with uploading the pictures to the image hosting site and adding the respective image link inside of the code from step 3, you need to look for this piece of code:
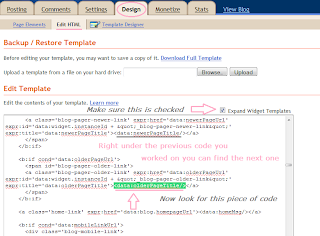
6. Now that you found the code paste this piece of code instead of it:
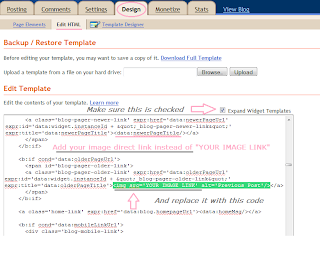
7. Next step after you replace the "YOUR IMAGE LINK" with the actual link of your second image, look for this piece of code:
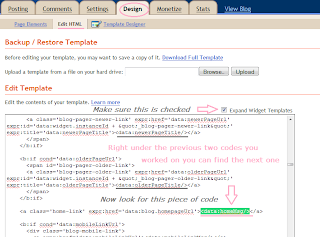
8. Now that you found the code paste this piece of code instead of it and don't forget to replace the "YOUR IMAGE LINK" with the actual link of your third image:
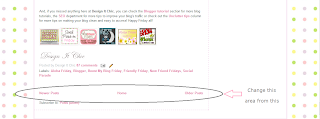
9. Last step before saving is previewing your work, and if it looks good then hit "Save Template", and your blog should look something similar from this:
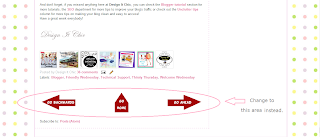
To this:
And just a side note, if you want to place the buttons from "next" and "previous" the other way around, as in change the left side and right side in between them, just switch the replacing code from step 3 with the one from step 6 and you'll get the buttons placed the opposite side.
That's it! Hope you guys enjoyed this little tutorial!:)
And don't forget, if you missed anything here at Design It Chic, you can check the Blog Tips button at the top of the page for more tutorials, tips to improve your blog's traffic and other amazing how to's, all presented on different levels, from beginners to the more advanced ones!
Have a great week everybody!

36 comments:
This is good stuff! Hi there - I'm hopping by and following from the hop - Shah at wordsinsync.blogspot.com X
Great blog and tutorial. Returning your visit to my blog.
I'll definitely be back!
Shirl x
stopping by to say hi from {Follow Me Wednesday}
would love you to pop over for a visit!
eleventhirtyish.blogspot.com
xx Bec
Thanks for making things like this look so easy!
Oh I'm so happy to have found your blog! Thanks for following mine. Yours is going to be so helpful to me. :D Thank you for sharing.
http://dinkalulu.blogspot.com/
I love this idea but when I tried it I could not find that second code on my HTML to delete the 2 lines under it. Then when I just did the first part it put the picture next to my blog post instead of on the header. HELP!
newest follower
Hi there! New follower of your awesome, informative, and helpful site! Found your blog from the blog hop. Hope you could follow me back. Thanks! :)
http://aimee-girltak.blogspot.com
Great tutorial!
Thanks so much for dropping by the Be-Bop-A Blog Hop! I'm a follower and I hope you'll stop by again soon! Have a great day! :)
Just stopped by from MidWeekMingle at Tara's and now a GFC follower. I added your button to my sidebar -you've got some great tutorials - will be back to read more later for sure.
Hope you can stop by my new blog WynnieBee- well I'm off to do more hopping. Have a great week!
Thanks for following. I love this! I always have a hard time figuring out how to do things on my blog so this is a huge help!! Love your blog!!
Man, you are awesome! Thanks for the tutorial. I am now following so I can be sure to get more of your helpful info!
Thanks for the follow. Following you back. Can't wait to try out some of your tutorials for my blog!
I am very impressed with your photography as well as you ability to make complex tasks seem doable. Because of this I have named your blog to my blogroll (bottom of right-hand column) so others will know I really like your blog. Congratulations!
Malinda @ http://malindawinkle.blogspot.com
@ Annie: There is no code to be deleted, only pieces of codes to be replaced. And the next/previous/home buttons will not show up at the top of your blog anywhere near the header, but to the bottom of it, so make sure you start the process from the top and follow the steps again. Hope it will help:)
Great tutorial! I found you through FTLOB! Can't wait to read more!
I bookmarked you and put you up on Face Book - great resource! Shah .x
Here from Bassgiraffe's blog hop! I love seeing the different things I can do to personalize my blog - now if I can find the time! One question, though, where do I find things like next/previous/home to insert in the first place?
Great tip! Just stopping back to follow back. Your blog looks great and I can't wait to read more!
1HecticMommy
I love this - I've added you to my sidebar so I don't miss a thing :) XOL
I am now following. Thank you so much for following my blog. Great to find people through Welcome Wednesday. Your blog is going to help me a lot.
Gilda
http://evan-and-lauren-a.blogspot.com/
Great tutorial! I love the tips for blogger blogs! I'm visiting from Tammy's blog hop and am your latest follower. Happy Thursday!
Great ideas!
Following back!
this is great! I have the Venturing into DIY blog and I'll definitely be trying this out. I also am following you as j.goop. Looking forward to using your ideas!
Hey! New follower for FTLOB.
Love what you're doing here! I think it's great to spread design and website information, because so many people are working on blogs nowadays! :)
Hey! New follower for FTLOB.
Love what you're doing here! I think it's great to spread design and website information, because so many people are working on blogs nowadays! :)
Great blog tutorial! I look forward to more!
Following you from Thirsty Thursday!
http://www.journeythroughmommyhood.blogspot.com
Good tutorial....if I didn't have errands to run today I might sit and play with it. :)
Thank you so much for visitng my blog....I am definitely following you bak and will be back for sure.
Great tutorial thanks for posting. Stopping by from FTLOB, looks like I need to read some more of your great tuts :)
Hi, I am a new follower from the Blog Hop! I hope you will follow the Platinum Touch Events blog back.
You have a great blog! I'm looking forward to reading more!
Nikola
www.platinumtouchevents.blogspot.com
I am so glad you found my blog on Welcome Wednesday. Thanks for all of your kind comments. Your blog is fantastic & I can't wait until I have a few extra minutes to start applying some of your blog tutorials to my blog. Thanks for all that you are sharing with all of us. I will come back often. I am a new follower.
Shauna
http://myshaenoel.blogspot.com/
Thanks for stopping by from the Blog Hop. I'm following you back:)
I adore this blog, and I'm book-marking it in my computer! I look forward to reading more... xo
-The Fickle Nickle
Hi! On the blog hop trail. Would love a follow back!
www.heavenlyhumor.blogspot.com
Blessings!
Thanks so much for the GREAt tips.
Great tips! this is the only spot I can find that helps with stuff like that! Thanks!
THis is great! When I have a chance, I'll have to try it out! Thanks!
Just letting you know that I linked to you on my blog for the Stylish Blog Award!
http://chasesview.blogspot.com
This is a great idea! I will have to try it.
Thanks from the blog hop....
Post a Comment